
تجنب أخطاء الالتقاط، ووقت التعطل، وأخطاء المشغل من خلال تعلم الطريقة الصحيحة لتحميل وحدة التغذية SMT Fuji الخاصة بك. سيرشدك هذا الدليل إلى كل خطوة بوضوح واحترافية.
ما هو مغذي فوجي SMT Fuji ولماذا يعتبر التحميل المناسب مهمًا؟
إن وحدة تغذية فوجي SMT هو عنصر حاسم في خط إنتاج SMT، وهو مصمم لتغذية المكونات من الأشرطة الحاملة إلى موضع الالتقاط في ماكينة وضع الماكينة. يمكن أن يؤدي التحميل غير الصحيح إلى حدوث أخطاء في التحميل أو اختلال في المحاذاة أو حتى توقف الماكينة، مما يؤثر بشكل مباشر على كفاءة الإنتاج.
✅ فوائد التحميل المناسب للمغذي المناسب:
- Improved placement accuracy and stability
- انخفاض معدلات الخطأ وإعادة العمل
- تآكل أقل على ماكيناتك
- تشغيل أسرع وأكثر أماناً
موديلات مغذيات فوجي الشائعة
قبل البدء، تأكد من معرفة نوع وحدة التغذية الخاصة بك. فيما يلي نماذج ملقمات فوجي الشائعة، وكلها متوفرة على موقعنا مع المواصفات التفصيلية والأسعار:
- مغذيات سلسلة فوجي NXT من فوجي
- مغذيات Fuji CP6 / CP642 / CP643
- سلسلة AIMEX
- سلسلة XP
🔍 ملاحظة: تختلف طرازات وحدة التغذية حسب توافق الماكينة - تحقق بعناية قبل الشراء.
ما ستحتاجه قبل التحميل
قم بإعداد الأدوات والمواد التالية قبل تحميل وحدة تغذية فوجي الخاصة بك:
- وحدة تغذية فوجي متوافقة
- الشريط الحامل للمكونات
- ماكينة وضع SMT (على سبيل المثال فوجي بيك أند بليس)
- قفازات ESD
- رف تغذية (اختياري)
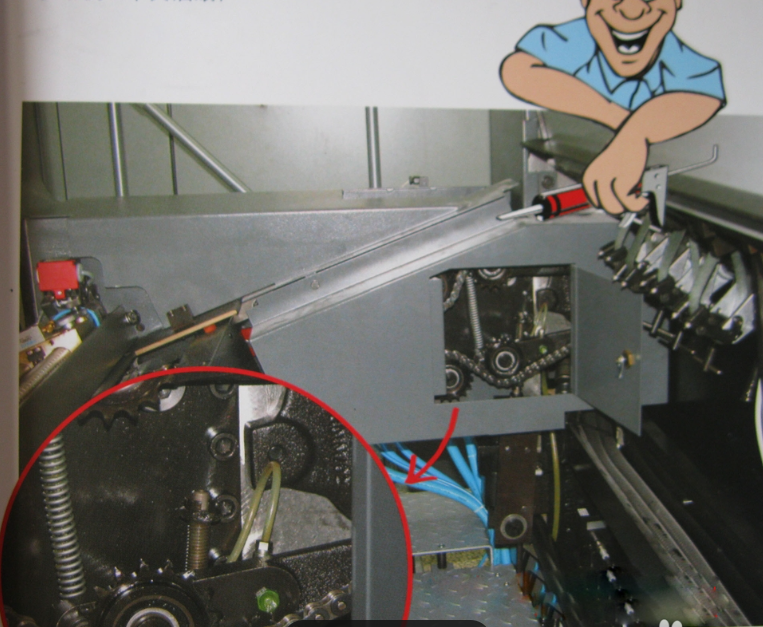
7 خطوات لتحميل وحدة تغذية فوجي SMT بشكل صحيح
الخطوة 1: فحص وحدة التغذية
- تأكد من أن وحدة التغذية نظيفة وغير تالفة
- ارتد قفازات التفريغ الكهرومغناطيسي الثنائي الباعث للكهرباء الساكنة (ESD) لمنع حدوث ضرر استاتيكي
الخطوة 2: أدخل الشريط اللاصق
- قم بتركيب بكرة الشريط على حامل البكرة الخلفية لماكينة التغذية
- قم بتغذية الشريط عبر فتحة الإدخال على طول مسار التغذية
الخطوة 3: محاذاة ثقوب العجلة المسننة
- تأكد من محاذاة ثقوب الشريط بشكل مثالي مع أسنان العجلة المسننة
- قم بتدوير العجلة يدويًا للتأكد من سلاسة التغذية
الخطوة 4: توصيل شريط الغطاء
- قم بتقشير شريط الغطاء وإرفاقه إلى بكرة الترجيع
- احرص على لفها بسلاسة وعدم تكدسها
الخطوة 5: اختبار التغذية اليدوية
- اضغط على زر التغذية اليدوية
- يجب محاذاة المكوِّن الأول بشكل صحيح عند نقطة الالتقاط
الخطوة 6: تركيب وحدة التغذية
- حرك وحدة التغذية في الفتحة الخاصة بها على ماكينة الالتقاط والوضع
- استمع إلى "النقرة" التي تؤكد أنه تم تأمينه
الخطوة 7: تأكيد الإعداد في البرنامج
- استخدم واجهة الماكينة لتعيين موضع وحدة التغذية ومعرف الجزء
- إجراء اختبار اختيار اختبار للتحقق من الوظائف
| الإصدار | السبب المحتمل | الحل |
|---|---|---|
| إزاحة الالتقاط | شريط الغطاء لم يتم إزالته بالكامل | تحقق من الشريط وأعد لفه بشكل صحيح |
| تساقط المكونات | توتر الشريط اللاصق الرخو أو الشريط اللاصق البالي | اضبط الشد أو استبدل الشريط اللاصق |
| لم يتم التعرف على المغذي | التركيب غير السليم | إعادة إدخال وحدة التغذية والتحقق من التوصيل |
هل تحتاج إلى مغذيات بديلة؟ تصفح موقعنا الكامل كتالوج منتجات مغذي SMT للعثور على خيارات متوافقة وطلب عرض أسعار.
الموارد ذات الصلة
- 🔧 ماكينات الالتقاط والوضع من فوجي
- 🔩 مغذيات SMT من ياماها (قارن مع فوجي)
- 📦 جميع موديلات وماركات مغذيات SMT
الأفكار النهائية: التحميل الموحد = كفاءة الإنتاج
إن تعلم كيفية تحميل وحدة تغذية SMT من Fuji SMT بشكل صحيح هو الأساس لتصنيع SMT المتسق. باتباع الخطوات المذكورة أعلاه، ستتمكن من تقليل وقت تعطل الماكينة وتحسين جودة المنتج.
إذا كنت تبحث عن مغذيات فوجي موثوقة ومتوافقة، تحقق من صفحة فئة وحدة تغذية فوجي SMT. نحن نقدم شحنًا عالميًا ودعمًا احترافيًا.
✅ هل أنت مستعد لترقية خطك؟ تفضل بزيارة مجموعة مغذيات SMT الآن لأنظمة الإمداد عالية الأداء.